Your browser version is outdated. We recommend that you update your browser to the latest version.

Welcome to my 'home away from home' - where I am going to try to share bits and pieces of what I know and understand about using Typeform. 

This site is my way of sharing things that I have learned about Typeform - outside the Typeform Community site. I'll be sharing "stuff" weekly (under the Other Stuff menu option above).

I have also created a bunch of Cheat Sheets and Templates specifically for Typeform projects that you can purchase (for a few pennies) that will help you get to end of project faster. 

Typeform launches "partial submit"

Posted 3/3/2024

Typeform has started to roll out “Partial Submit” as a question type! This is potentially a great feature but needs a little work to be really useful in complex quizzes that use logic rules.

One of the big concerns for many folks in the Typeform Community is the ability to capture the email address of someone who starts their form but never submits. (There are several quiz/survey concerns about being entitled to ask for email address at the beginning of the form but that is a separate topic).

This partial submit feature could used to capture the email address early in your form – just case someone does not hit the final button.

Note the new option under Form Structure when you choose to add a question.


email

Read the rest of this entry »

Logic rules for tie-breakers in a 6 category scoring quiz

Posted 2/14/2024

I thought I would create this for all those who are trying to figure out how many ‘tie-breaker’ questions they would have to create - and how to set up the logic rules to direct the user to the correct tie-breaker - IF they are working with 6 categories.

Below is the list of the combinations that could arrive in your quiz if you are looking to resolve the ties that might occur in your scoring.

You would need to create all the tie-breaker question pages and put them somewhere in the quiz. I have found it easiest to use question groups to put ‘like’ questions inside. For example, all the tie-breakers related to two subtotals tied, another for three subtotals tied, etc.

Read the rest of this entry »

Weighting in a scoring quiz - an example

Posted 2/5/2024

It's still Monday as I send this out to you this week - starting with an apology on the delay in sending out the email. Blame it on a Disney World 'hangover'.

Just a couple of things for this week - some actual Typeform news that you might be able to use (or be interested in):

If you are a Webflow user:

If you have an integration to Airtable - new integration as of beginning of January

  • Did you make the changes in the article by Feb 1? If not, it is not too late to do so.

Now for my part...

I had a request about ‘weighting’ in a scoring quiz - when and how should you do the logic to set up a simple weighting schema.

You can do it by assigning ‘points’ to each response and setting the ‘more important’ answers to receive more points. You do that in each question as you go along in your quiz or at the end as you get ready to route your respondent to an ending based on segmentation.

Read the rest of this entry »

Using Google Sheets "split" function to separate your typeform's multi-select multiple choice output

Posted 1/15/2024

Happy New Year folks. 

I hope that you and yours had a great end of year celebration - regardless of HOW or WHY you celebrated!

Ok down to work - a short tip this week: I helped a client realize there is a very simple way to take the output of a multiple selection choice and split the values into separate columns. 

(Note: he’d paid someone to create a zap to do the same thing because he didn’t know about Google Sheets’ “split()” function) 


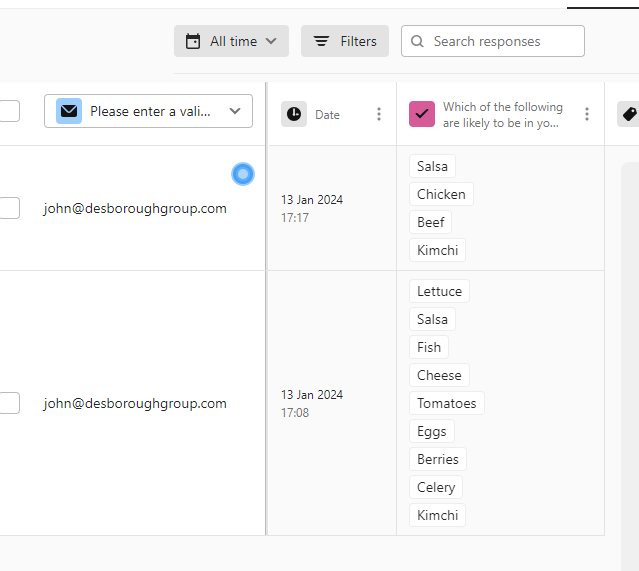
Scenario: you have a multiple-select multiple choice question that throws a string of the responses into one column - each choice is separated by a comma. 


The image above shows the Results in Typeform. The image below shows what lands in Google Sheets once you have Connect-ed the typeform. 


Note that the selections show up as a comma separated list. 


What’s the trick to separate these inputs into separate columns so I can pull them into a report more easily?


Read the rest of this entry »

Creating Customized Reports from Your Typeform data

Posted 12/18/2023

Twas the week before Christmas and all through the house, was the smell of fresh gingerbread - we’re making a house.

And so, as the preparations for the holiday season are well underway, I thought I would revert back to one simple ‘trick’ I have used many times. Creating personalized reports from the responses to a Typeform.

I’ve done a bunch of Community posts on the elements of this. I even hosted a Community Workshop on how to do this - the link will be posted down below so that you can watch the video and get access to a bunch of supporting info.

Why?

You can only do ‘so much’ with the endings in Typeform to give folks a customized report.

So what?

If you want to send them a PDF document that is customized based on the responses given by the user, then you have to look outside native Typeform.

Here’s the toolset:

  • Typeform
  • Google Sheets
  • Google Docs/Slides
  • Document Studio - from Digital Inspiration (spend the $100 USD to get the Enterprise version - well worth it)

Now I am making the assumption that you have Gmail for the purposes of this article but Document Studio supports a number of email platforms. I use Google Workspace for my business so Gmail it is.

I’ll give you the basics here but you can watch in more detail in the Typeform Community Workshop video.

Step 1 - create your typeform

  • Make sure that the email question is required - I may sound like Captain Obvious here but you need to be able to send the output email and report to somewhere
  • Connect your typeform to Google Sheets - you’ll need the data over there for this to work AND it’s a good idea to have the backup copy of your data outside of Typeform
  • Publish it and create a test record with your email (or a test account email that you use)

Step 2 - create a Google Doc or Slide template

  • this will contain both the static text and the ‘markers’ (what Document Studio calls them) or placeholders for the dynamic/customized text from the typeform that you are going to show on the slides.
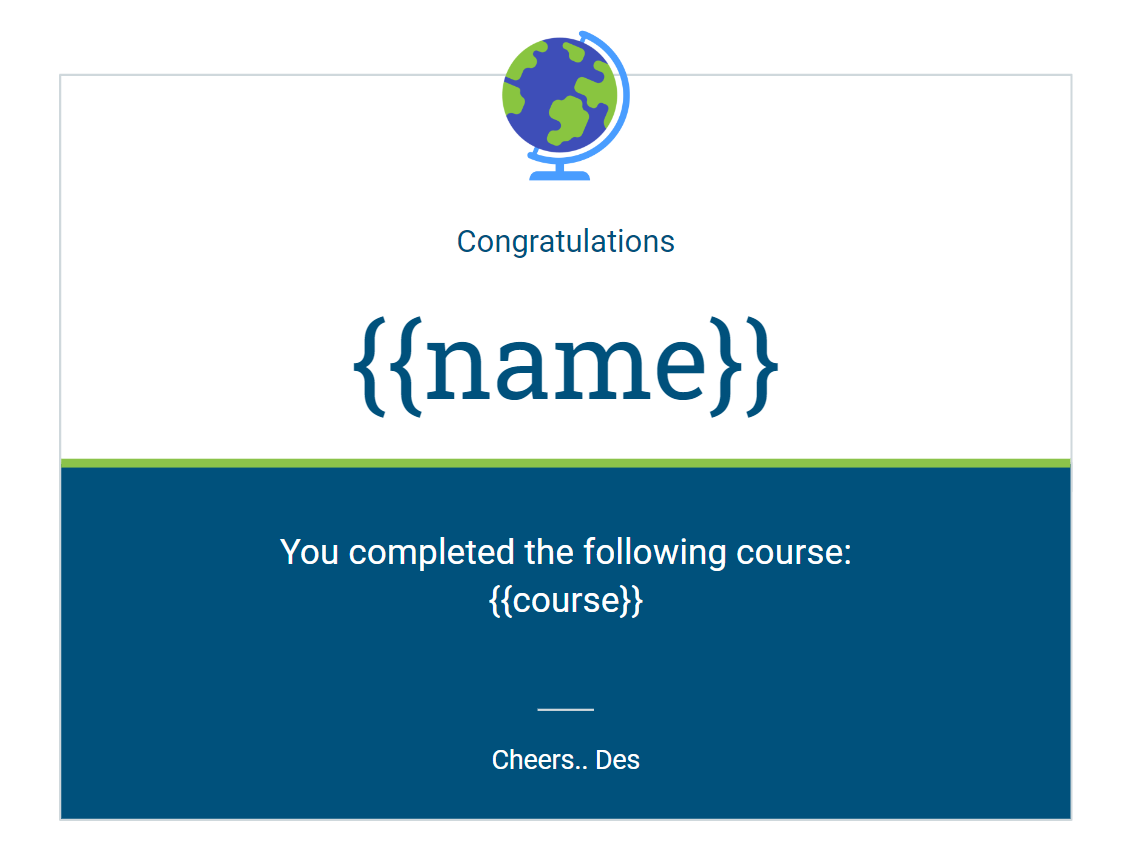
  • Here’s an image of a simple one that was used in the workshop - note the that are around the Google Sheet field names. That’s how Document Studio needs the ‘markers’ to be defined.

Step 3 - create an extra tab in your Google Sheet for reporting purposes

  • When you Connect your typeform to Google Sheets, the column headers in the main Sheet tab are the text of the questions - they can be exceedingly long
  • Create a tab called Report - or something similar - and then create some simple column headers for each question: like ‘name’ and ‘course’ from the image above
    • Name is much easier than the question text in typeform - “Please enter your first name so that I don’t have to call you ‘Hey You’”
  • Use the arrayformula() function in Google Sheets to pull the data from the main response tab into the appropriate columns
    • Using this function will automatically pull each new typeform submission from the first tab to this reporting tab and have the data ready for use in the PDF file creation and send process
    • More details in the workshop video and the post in the Community has a link to the sample arrayformula’s that I used - you can check those out

Step 4 - create your Document Studio workflow

  • This is where we use Document Studio to create a workflow with two (2) tasks - create the PDF file and send the email with the file attached. All the steps are shown in detail in the workshop video - I’ll give you the highlights below
  • Assuming that you have acquired and installed the software (it’s really simple to do) then the following steps will get to the end goal:
    • Create a new workflow and give it a name
    • Select the Action to create a PDF file
    • Identify the merge template (your Google Slide/Doc), the folder in which the output files should be stored, the name of the output file and the type ie PDF.
    • You can test this action in the workflow now - to see that the correct fields of data are shown in the markers in your output template - or wait and test both steps in a few minutes.
    • Once you save this first action, choose to Send Email and follow the steps to identify the email provider, create the content of the email and to ensure the PDF file is attached.
    • Save the action
    • Now you can test both - choose Save and Run the workflow. This will allow you to generate the PDF and have the email sent to your account/test email account.
    • Once you have validated that the email displays your content correctly and has the PDF file attached, you can set the ‘when to run’ options for the workflow and save the entire thing.
      • I recommend that you set it to the “every hour” option - the workflow will run in the background every hour and will catch all the entries that have been submitted since the last run

That’s the highlight reel - or maybe the Readers’ Digest - of the steps to create a customized report for your typeform respondents. You can make the template as deep and complex or extremely simple as you wish.

If you didn’t catch the workshop in the Community, you’ll see that there are three different scenarios that were covered using these tools. Hopefully you can find all the details that you need over there.

Here’s the link to the Typeform Community post with the video and all the resources/links you might need to get going on this!

As always, if you have any questions, feedback or small unmarked bills you want to throw my way, please tell me what you think in the comments below.

Cheers

des

Read the rest of this entry »

Using Typeform Outcome Quiz endings to drive Convertkit automations

Posted 12/11/2023

Dec 11th - ten days till we start to get more sunshine every day. 14 day till The Guy in The Red Suit will have delivered goodies under your tree. At least in this house, that is the countdown.

For those who don't celebrate Christmas, thank you for putting up with us who do. If you are celebrating something at this time of year, I hope that your celebration brings peace and joy to you and yours.

Now, let me try to add a little goodie/treat for today. It's a bit of a continuation of the concept from last week: using the endings from a scoring quiz to drive the Convertkit automations.

This week, I was trying to 'match' up the same process with the endings from an outcome quiz.

This time around we are going to take an outcome quiz, add a tag to the Convertkit record and capture the ending to which the user was routed in your typeform.

You’ll be able to use the tag - think of it as a trigger tag for your automation - to kick off an automation automatically. We’ll use the ‘ending’ detail that gets carried over into Convertkit as part of a condition to route folks into a sequence. (That’s what the newsletter from last week covered btw - I won’t repeat a lot of the details in this one. I’ll make you do a little legwork to go read that part.)

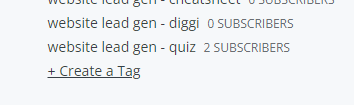
To prep in Convertkit, we’ll go over there first and create the tag and a custom field to hold the form ending. NOTE: I am making an assumption that you are ok with adding the field to your subscriber’s data set - I use this method to capture info from specific quizzes where I want to be sure that I have the data to use for the conditions in my automations.

and


The full details are over in the Google Doc - I'll add the link down a little further.

Now we are ready to go back to our typeform and check out the details.

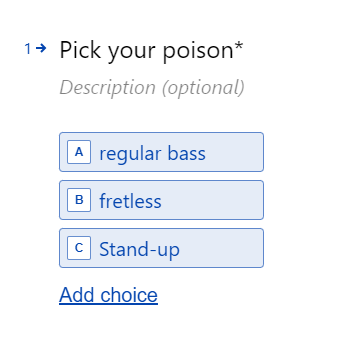
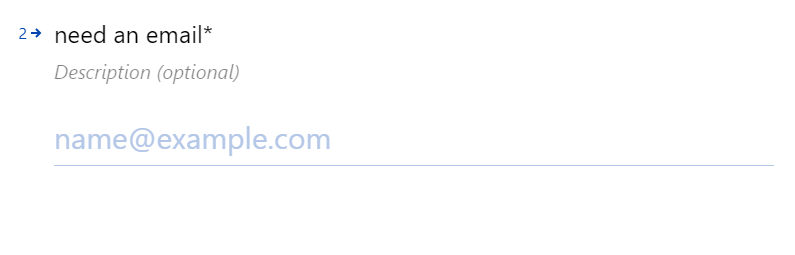
I created a simple form for this - one multiple choice question and an email question. Each of the options in the multiple choice will lead to a an outcome ending.

Here’s the first question:

It’s required. User can only choose one.

The email is required to create a record or update a record in Convertkit. The field is required in this example.

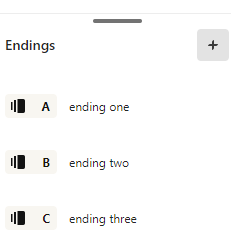
As you can see I have 3 endings - simple and not too creative but that’s me.

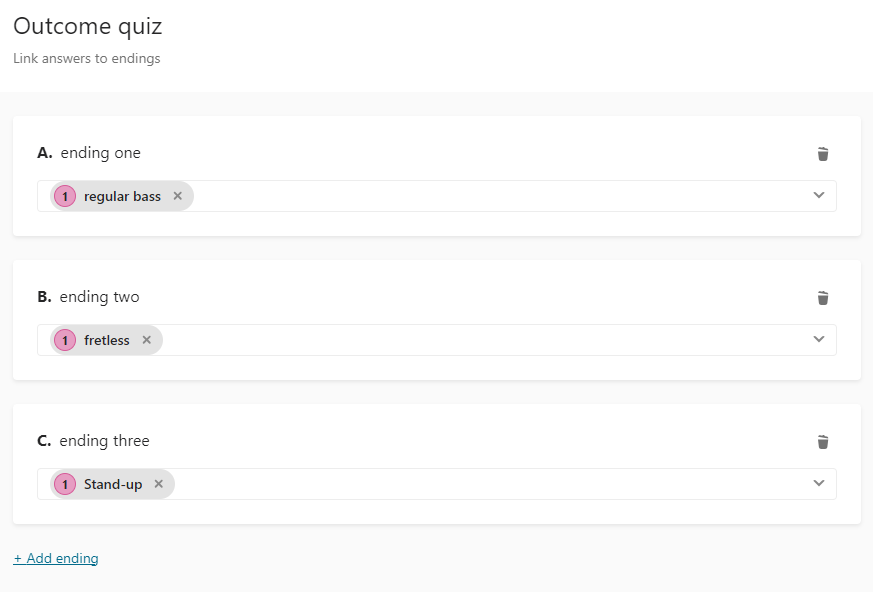
That’s all for the structure and content of the quiz. The image below shows the outcome logic.

This is a really simple example just to show how to capture the endings into the zap and over to Convertkit. You can have as complicated an outcome quiz as you want.

Next to set up the Convertkit side of the zap. (By now, setting up the Typeform side of the zap to select the form to use, should be easy enough to do. You can check last week's newsletter if you need to)

Once you have confirmed your account details, you’ll be moved to the Action section. Here you’ll enter in the tag you want to assign (bass-face in my case) and select the email question to provide the input into the email field.

Next you want to make sure that you have the correct ending information going into the custom field that we created to hold the ending details.

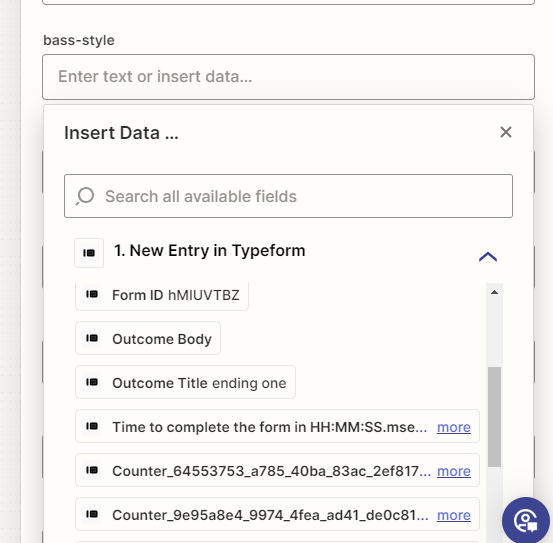
In this case, I want to select the Outcome Title option for the field bass-style as shown in the image below.

There are a couple of outcome fields available but the Outcome Title is the one you WANT to use.

Scroll down as necessary until you can click on the Continue button to save these details and move to the Test section.


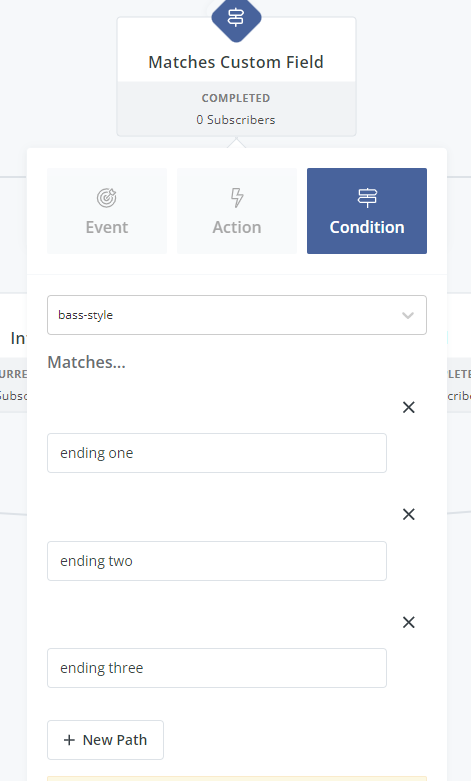
Now you should be able to 'duplicate' the automation we made last week for the scoring quiz and make the changes to the Condition - Matches to enable the split paths to the various sequences in the automations that relate to each ending.


Now, I'll be honest here: my ending pages are just those short phrases. Very little text. If you put a lot of detail on your ending pages, you will need to recognize that ALL the text is going to be put into the custom field. You might run into some restrictions on the length of the data that you are passing into the field in Convertkit.

There is a way to work around this using two typeforms, some hidden fields to pass data between the forms on the redirection upon completion , and using two zaps. Yup, two zaps - one to create the entry with all the details passed in during the submission of the first form AND the second to pass in the 'short ending' you see above, for example, to the record you just created in Convertkit. The second zap will trigger the automation.

That's next week's topic - just to close the loop on these 'essential' zaps to connect Typeform to Convertkit.

And that’s it for setting this up this week. Here’s the recap:


  • Created an outcome quiz in Typeform
  • Created the necessary tags and custom field in Convertkit
  • Created the Zap to put the data from the typeform into the Convertkit record.
  • Updated the automation by making a copy of the previous one (last newsletter)

You can find all the details on the steps in this Google Doc - as usual, trying NOT to steal too much real estate and/or brain time.

That’s enough to keep you busy for a week. Ok. maybe a day or two.

cheers for this week.

des

(aka john desborough)

Read the rest of this entry »

Segmenting your Typeform respondents into different Convertkit email sequences

Posted 12/4/2023

Howdy from the 'ice hut' - the igloo is coming later.

​Well today was freezing rain through most of the day here. Not a great day to be outside. But good enough to spend the time cleaning out the garage in order to get both vehicles inside. Before the snow falls for the rest of winter.

And then to spend some time inside at the keyboard working through the details of today’s episode of the newsletter.

Topic today stays with connecting a Typeform assessment quiz to Convertkit. We’re going to extend the simple connection to passing over both the ‘score’ of the quiz and the calculated ‘level’ of the respondent. The idea here is take the ‘level’ (Beginner, Intermediate or Advanced) of the respondent and get them into an email sequence specific to the stream.

Make sense?

(TL;DR - Here's the link to the Google Doc.)

We’re NOT going to explore having Zapier figure out the appropriate tag/level to add to the Convertkit record.

We’ll send both the score and the ‘level’ from the quiz across as variables. BUT we are going to store those values into a couple of custom fields created in the subscriber profile in Convertkit.

We’ll also assign a tag in Convertkit to act as a trigger for the automation that will put the user into the right sequence in the automation.

This whole scenario comes from a Community thread this past week - so hopefully this is going to help out folks immediately.

Let’s get started with the Typeform end.

Here’s the overall scenario of the quiz - it’s simplified to the bare bones to demonstrate how to implement this scenario.

For the purposes of this scenario, I wanted to follow the structure provided in the Community post. In terms of the overall scoring and categorization, this was what was provided:

  • Beginner (0-25)
  • Intermediate (26 to 68)
  • Advanced (69 to 125)

So, depending on what the user enters as the number, we will slot them into the appropriate ‘level’.

The Contact Info question starts off the quiz.

The First name and Email fields are set to required for this one.


Now, for the second question, I am using a simple number entry form instead of going through a series of questions in an assessment to develop the total score. This makes it so much easier for me to show the logic rules in a bit and you should be able to follow the overall concept easily.


Now for the variables.


These are the variables that we are going to pass into and store in Convertkit. We'll use the content of the v_result variable to actually drive the automation to segment the user into different possible email sequences.

Here's what the automation will look like in Convertkit when we are done!

Now, to find out how the logic rules are set up in the typeform, the details of the prep work in Convertkit to create the automation above and then the zap that sends all the details across from Typeform to Convertkit, you'll have to go check out the Google doc I created. It reduces the length of this post and makes it easier for you to make a copy for your own usage.

Here's the link to the Google Doc.

I will also state that the automation shown in the image above can be extended after the email sequences to do things like move the user from a lead nurturing sequence to an on-boarding sequence if they were to buy the services. Or...

that's it for this week.

As always, please hit reply and let me know what you think. Or if you have a request for another tip/trick you would like covered.

cheers

des

(aka john desborough)

Read the rest of this entry »

Connecting Typeform and Convertkit using Zapier

Posted 11/27/2023

Happy Cyber Monday - nope not from a sales and marketing perspective. Not at all.

Just the fact that we have another chance to connect electronically and share some Typeform nuggets with you.

I hope you have gotten some value out of the posts here so far.

This week I was asked to cover how to put in place the integration between Typeform and Convertkit. So here goes a simple introduction on how to do make that work.

(TL;DR - Here's the Google Doc link)

Typeform used to have a ‘native integration’ through the Connect panel. But that was disabled back earlier in the year. To make this work now, you will need to use Zapier, Make or some similar integration tool .

For the purposes of this example, I’ll use Zapier - I’ll be using the Starter plan. That’s the subscription level I use for these demo sessions.

From the Convertkit perspective, I’ll use the Creator level plan. This allows me to have automated email sequences and visual automations.

The scenario that we are going to look into is how to get a a new subscriber to a newsletter form in Typeform into Convertkit - and have them automatically added into a welcome sequence of emails.

I won’t go into great depth in the Convertkit automation or email sequence BUT I will show you around them briefly. I’ll call out a few of the high points but let’s focus on getting the submission from your typeform into Convertkit.

Let’s get started here in the email but then I'll send you over to the Google Doc for all the details in a bit.

Here’s the Typeform form that we are using:

Now that’s a pretty simple looking version of the Contact Info question type. No welcome screen, just straight into the question.

Now, over in Convertkit, I want to assign a tag to the folks who sign up through that typeform and then get them into an email sequence to welcome them to the newsletter. For example, here's a two email welcome sequence sample.

But I want to trigger these emails as part of an automation in Convertkit that will run while I sleep.

In essence, when a user completes the typeform, I want to capture their details in Convertkit, assign the tag '[newsletter] typeform tips' and automatically trigger the newsletter sequence to run.

In the image of the two-email sequence, I could expand this out to many more emails - back issues of the newsletter if the user arrives, say, at issue 12. How can I get them into a sequence to get the prior issues as well as those going forward? That's a whole other topic of discussion down the road lol.

Now, how to do this in Zapier? Now that there is no longer a native integration in Typeform to Convertkit, we have to use an alternative.

If you want to see the steps fully laid out, you can find them in the Google Doc here.

I hope you don't mind heading over to the Google Doc to see the steps in much greater detail. I don't want to kill this page.

And if you did read all the way down here - Thank YOU!

You can find a short-ish video of how this works here

I hope you can find a use for this information.

have a great week. 


des

Read the rest of this entry »

Creating Dynamic Graphs from your Typeform Responses - 2 years in the making!

Posted 11/20/2023

I’ve finally figured it out - it’s only taken me about two and a half years!

How to create a ‘radar’ chart in Google Sheets for a report - based on Typeform submission. Or any other graph that is.

Here’s the use case - or at least one of them:

You are using a scoring quiz to evaluate some aspect of the respondent and want to show a graph of the output. Say, 5 categories of an assessment or something similar.

You want to send them a customized document after they submit their data, complete with a graph of the results.

Here’s the toolset:

  • Typeform
  • Google Sheets
  • Document Studio (yeah that one again, lol)

If you don’t have Document Studio, I strongly recommend getting it as it will help generate a lot of customized reports from your Typeform data - pushed into a merge template, converted into PDF format and attached to an email.

Now I will be honest - I have not explored all the formatting options inside the Google Sheet charting options. BUT I wanted to get this wee bit of a note out to you folks while the seven other voices in my head are doing the happy dance.

In any event, let’s check it out.

I want to turn this input from my typeform:


into a PDF report with graphs that look like these:


That's a screenshot of the PDF file - a really simple example of a dynamic report - that shows a 'customized report' for the respondent complete with the two different graph types.

I can't believe it took me over two years to figure this out!

I've put all the steps into this Google Doc - saving screen real estate - for you.

There's also a video for this at this link

Check these out and let me know!

Hopefully you haven't been waiting for two years to figure this out.... 

 cheers

des

Read the rest of this entry »

Using hidden fields to start users at different points in the form

Posted 11/13/2023

Today’s scenario: you have a link to a typeform on your website or social media post/bio AND you send the link out from your CRM/ESP to folks in your email list. But you want the users to ‘start’ the typeform at different spots.

Can you have 1 (one) typeform which will take, for example:

  • existing purchasers of your product(s) to one spot to ask some questions about their product experience
  • non-clients coming from a random URL you have posted to another spot to ask some questions about themselves and their organization

The technique I’m going to show you today have been implemented for about two dozen clients over the past year. I’ve also seen about a dozen of these requests in the Typeform Community as well. So I thought I would cover it today.

Here’s the essence of what we are going to do in the form:

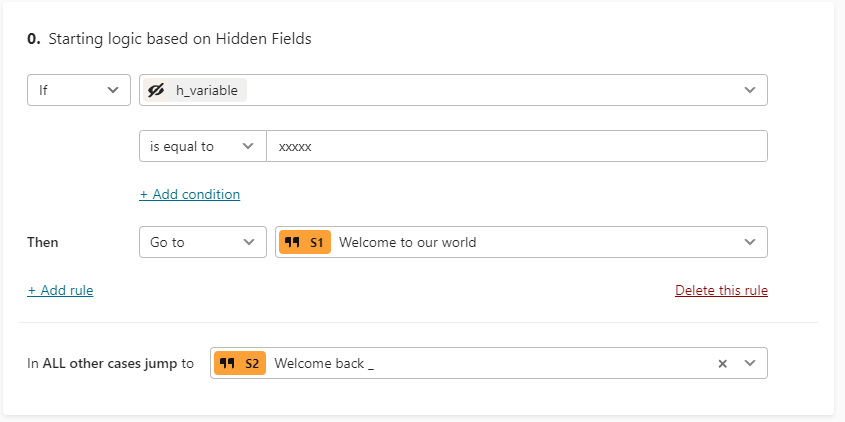
  1. Using logic rules on hidden fields to determine the start point
    1. Hidden field is called ‘h_variable’
  2. We’ll assume, for this example, that we send a subscriber’s email address in the URL from our mailing list
    1. For example…. ‘h_variable=username@email.com’
  3. All other links which we point to this form will use the ‘default string’ for the hidden field that is created when you publish the for ‘xxxxx’
    1. Default value on publishing looks like …’h_variable=xxxxx’

Fair enough?

When we get to publishing the form, here’s the URL that is created - note that I created a custom link name for the form.

  • https://desborough.typeform.com/2welcome-stmts#h_variable=xxxxx

This URL is what we use for the ‘random links in the wild’ to the typeform. (You might add UTM parameters if you want but for this note, I’ll keep it simple.)

When we send folks from our CRM/ESP to the typeform, we’ll be sending something along these lines:

  • https://desborough.typeform.com/2welcome-stmts#h_variable=


The syntax for your CRM/ESP to dynamically include an email may be different BUT it should end up with a result that might look like this when it arrives at the mailbox:

  • https://desborough.typeform.com/2welcome-stmts#h_variable=username@email.co

Make sense so far?

The image below is HOW we do that in the logic rules. At the start of the form, this set of rules is run first and foremost.

So what does the whole thing look like? I've put the whole thing into a Google Doc for you - it saves space in your inbox and makes it easier, I think, to be able to have you go back and look at it.

In the Google Doc, I cover the questions and the logic rules that make this work easily and simply. You can extend this in many ways and add other hidden fields, etc. But to get you started...

This is a really simple way to put this in place. Especially if you want to use one common URL to one form, from both your CRM/ESP or from random links you place in the wild.

Hope this makes a little sense about an easy way to get a single form to handle two purposes - just in case you need it someday.

Cheers till the next time.

des

(aka John Desborough)

Read the rest of this entry »